Unnamed platforming game - 2d playstation vita game with box2d physics
project Timescale: MARCH 2014 - MAY 2014
Unfortunately, I do not have any screen shots or videos of this project as it was developed on a PlayStation Vita development kit and we were not given the tools to capture images from the Vita's screen. The application was written in C++ using Abertay University's own game framework. Below is the report I wrote on the project and the code files I wrote for the game.
| box2d_game_code.zip |
Introduction
The aim of the project was to design and construct a 2-dimensional physics based video game for the PlayStation Vita. It was required to make use of a physics engine called Box2D which can create physics simulations to move sprites and perform collision detection between them. It also needed to include animated sprites, audio, a menu system to set parameters and a graphics based splash screen.
The created application is a basic platformer. The player has the option of playing as a red or green character that are both based off the design of Mega Man from Mega Man X (1993). Rather than jumping from platform to platform, the focus is on wall jumping. By jumping off walls, the player can traverse over distances and by jumping between them, they can traverse heights. The player also has the ability to fire arrows that stick into objects that they collide with. Throughout a level of the game, there are various targets placed. The player has to use a limited number of arrows to hit as many of these targets as they can and proceed to the end of the level. The more targets they hit, the higher their score will be. There is only one level implemented but more can easily be added now that the framework is in place.
Application Design
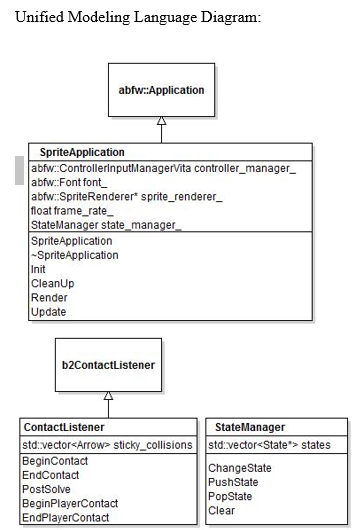
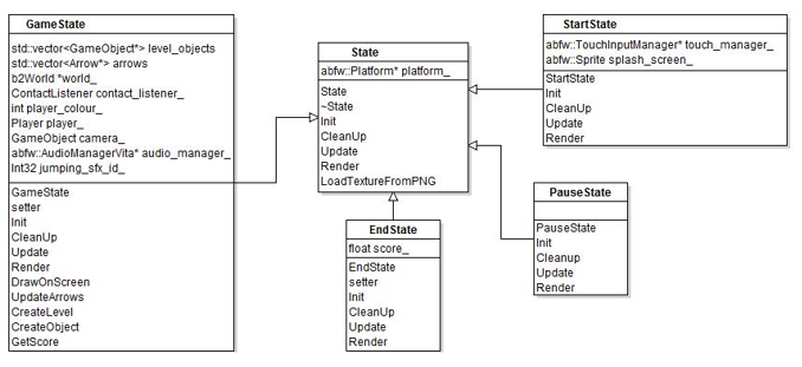
The program was planned to contain a State class which would contain virtual functions for initialising, cleaning up, updating and rendering objects in the application. Other classes would inherit from this class and override the virtual functions. A StateManager class would store all the different states and switch between them as necessary.
Four different types of states would be used; a StartState to display a splash screen that lets the user set parameters and start the game, a GameState that runs all the game logic such as moving and rendering sprites, a PauseState that allows the user to pause and resume the game and an EndState that displays the player’s score and allows them to restart the game.
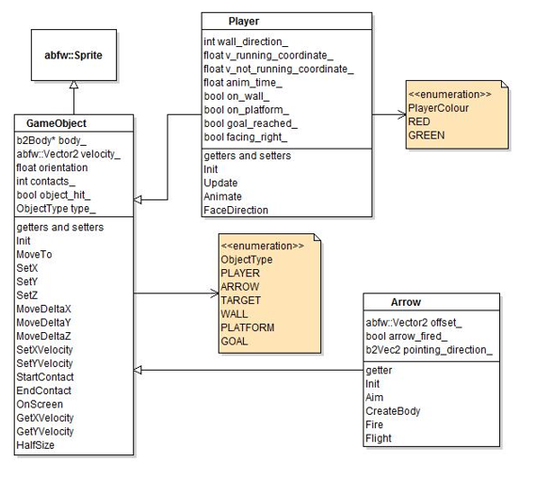
A GameObject class would be used for any item that would appear on screen, allowing them to be moved around the screen in different ways and collide with each other. The movement and collision would be controlled using a Box2D physics simulation by storing a physics body in the class. The class would also store the type of GameObject such as player, arrow, platform etc.
The programmer intended to have two classes that would inherit from GameObject called Player and Arrow, respectively.
The Player class would be used to manage the main sprite that the player controlled. It required animation to show the character running and jumping. It also stored whether the object was on a wall or platform so it would move in the correct direction when the character jumped.
The Arrow class would be used to create an object that the user could aim in a direction by rotating it around the Player. When the user fired the object, the Arrow would fly in the aimed direction and stop when it hit another object with a high enough impulse.
All the collisions between Box2D bodies would be handled by a ContactListener class. This class would find out how many contacts are on a body and what GameObject type was associated with each body. It also determined when an arrow should stick to another body or not upon colliding.
The aim of the project was to design and construct a 2-dimensional physics based video game for the PlayStation Vita. It was required to make use of a physics engine called Box2D which can create physics simulations to move sprites and perform collision detection between them. It also needed to include animated sprites, audio, a menu system to set parameters and a graphics based splash screen.
The created application is a basic platformer. The player has the option of playing as a red or green character that are both based off the design of Mega Man from Mega Man X (1993). Rather than jumping from platform to platform, the focus is on wall jumping. By jumping off walls, the player can traverse over distances and by jumping between them, they can traverse heights. The player also has the ability to fire arrows that stick into objects that they collide with. Throughout a level of the game, there are various targets placed. The player has to use a limited number of arrows to hit as many of these targets as they can and proceed to the end of the level. The more targets they hit, the higher their score will be. There is only one level implemented but more can easily be added now that the framework is in place.
Application Design
The program was planned to contain a State class which would contain virtual functions for initialising, cleaning up, updating and rendering objects in the application. Other classes would inherit from this class and override the virtual functions. A StateManager class would store all the different states and switch between them as necessary.
Four different types of states would be used; a StartState to display a splash screen that lets the user set parameters and start the game, a GameState that runs all the game logic such as moving and rendering sprites, a PauseState that allows the user to pause and resume the game and an EndState that displays the player’s score and allows them to restart the game.
A GameObject class would be used for any item that would appear on screen, allowing them to be moved around the screen in different ways and collide with each other. The movement and collision would be controlled using a Box2D physics simulation by storing a physics body in the class. The class would also store the type of GameObject such as player, arrow, platform etc.
The programmer intended to have two classes that would inherit from GameObject called Player and Arrow, respectively.
The Player class would be used to manage the main sprite that the player controlled. It required animation to show the character running and jumping. It also stored whether the object was on a wall or platform so it would move in the correct direction when the character jumped.
The Arrow class would be used to create an object that the user could aim in a direction by rotating it around the Player. When the user fired the object, the Arrow would fly in the aimed direction and stop when it hit another object with a high enough impulse.
All the collisions between Box2D bodies would be handled by a ContactListener class. This class would find out how many contacts are on a body and what GameObject type was associated with each body. It also determined when an arrow should stick to another body or not upon colliding.
|
|
Techniques Used
In order to implement a state machine, the application used a State class and StateManager class. This was based off the method described by Sparkart (2009). Each state had its own class which inherited from the State class and over rode the virtual functions for initialising, cleaning up, updating and rendering. As well as the virtual functions, the State class also had a load texture function and stored the platform so that every state could have textured sprites. The StateManager class stored all these states in a vector. It had four functions called clear, change state, push state and pop state. The clear function looped through the vector, called each state’s clean up function and removed it from the vector. The change state function called the current state’s clean up function, removed it from the vector, added a new state to the vector and initialised the new state. The push state function added a new state to the vector and initialised it. The pop state function called the currents state’s clean up function and removed it from the vector. This allowed the program to easily pause, resume and change states.
For the platforming mechanics the application used a Box2D body to represent the player. Every frame that the player was in contact with another body, a linear impulse would be applied to them. The force was calculated by multiplying the mass of the body by a derived velocity and it was applied to the centre of the player. The derived velocity was the difference between a desired velocity and the linear velocity of the body. The horizontal component of the desired velocity was set to five if the player was on a platform and the user pushed the left analogue stick right, minus five if the left analogue stick was pushed left and zero if the stick was pushed in neither direction. The vertical component of the desired velocity was set to six when the user pressed the X button and set to zero when the player wasn’t in contact with anything. When the player was in contact with a wall and the user pressed the X button, the horizontal component of the desired velocity was to either six or minus six, depending on what side of the wall the player was in contact with.
The player was animated by switching between images on a sprite sheet. A function was used to see if the player was facing left or right and see if the player was standing on a platform, clinging to a wall or in the air. It would make the UV width positive if the player was facing right and negative if the player was facing left. It also changed the UV coordinates to match the appropriate image for the player’s current condition. For the running animation, while the player was moving left or right along a platform, an animate function was called. This function kept track of the amount of frames that had passed in the application and every time this amount of frames exceeded the duration of one frame of animation, it reset the counter and added the UV width of the sprite to the UV x-coordinate. When it reached the end of the sprite sheet, it would set the UV x-coordinate back to the first image.
In the game state there was a vector that stored all the arrows and a function to update them. First this function looped through another vector, provided by the contact listener class, which stored all the arrows that had hit another body with enough force to stick to it. The bodies of these arrows were deactivated to freeze the arrows in place. Making it look like they were sticking into the object. Next the function checked for user input. When the user pressed the right shoulder button, a new arrow was added to the vector and initialised. At this point, it is only a game object and doesn’t have a physics body attached to it. When the right shoulder button is released by the user, a body is created and has an impulse applied to the centre of the body in the direction it is facing. Lastly, the function looped through the vector to see if each arrow was being aimed or was in flight. If the arrow was being aimed, it would move around the player and point in the same direction as the right analogue stick. This was done by using trigonometry to get the angle of the stick and the necessary offsets to position the arrow away from the player. If the was arrow was in flight a drag force calculated and continuously applied to the tail of the arrow.
User Guide
The user starts the game by selecting the red or green character with the touch screen. The user can then pause the game at any time by pressing the start button and unpause the game by pressing the start button again. The player moves with the left analogue stick. Pushing it left moves the player left and pushing it right moves the player right. Pressing the X button allows the player to jump. The player cannot change their movement while in mid-air. Jumping into a wall will cause the player to grab onto the wall. Jumping again will then push the player up and away from the wall. The player can notch an arrow by pressing and holding the right shoulder button. Whilst holding the button, the player can aim the arrow by moving the right analogue stick. The arrow will point in the same direction as the stick. Upon releasing the right shoulder button, the arrow will fire in the direction it was pointing. A direct hit on an object, will cause the arrow to stick into that object. Sticking an arrow into a red target will earn a point that is added to the score. When the player touches the black goal square, the level ends. The player will be shown their score and can restart the game by pressing the start button.
Critical Analyse
The levels are built by hard coding positions for every object. These positions are all multiples of declared constants such as the screen dimensions and the distances between objects. Declaring constants for each object position and size would have greatly simplified the functions for the creating these objects. An even better solution would have been to use some form of level loader. Using this in conjunction with level editing software would’ve made the building of levels a much quicker and easier task.
Arrows were made to stick to objects by deactivating their bodies upon collision. The problem with this is that the arrow can no longer have forces applied to it when it has collided and its tail can stick into objects. A better method would have been to form a weld joint between the arrow and the object they hit as detailed by iforce2d (2013). . This was attempted but had to be cut from the application due to a bug that the programmer was unable to fix. Originally, rather than a vector of arrows that had collided, the contact listener class contained a vector of structs. These structs contained both body of the arrow and the body of the level object. In the game state’s update arrows function, it would loop through this vector and create a weld joint between the two bodies in the struct. This didn’t work however since the game state was unable to access the properties of the level object bodies. The strange thing was that it could still access the properties of the arrow bodies despite the fact they were stored in exactly the same place.
Platformer games usually allow the player to control their movement while they’re in mid-air. The application restricted this since having that control meant that wall jumping didn’t function correctly. Rather than pushing off the wall horizontally when the player jumped, they would only move vertically. This meant that the player could just repeatedly move back against the wall after jumping and climb up it. In order to fix this, rather than having one calculated impulse applied to the player’s body every frame, different impulses would need to be applied at different situations. That way an impulse pushing the player away from the wall won’t immediately be changed to an impulse moving the player towards the wall.
References
Sparkart. 2009. State Management Using A State Manager. [online] Available from: http://www.dreamincode.net/forums/topic/118898-state-management/ [Accessed 11 April 2014]
iforce2d. 2013. Box2D C++ tutorials - Sticky projectiles. [online] Available from: http://www.iforce2d.net/b2dtut/sticky-projectiles [Accessed 13 May 2014]
