PlayStation Vita Augmented Reality Game - 3D Platformer with Level Editor
Project Timescale: march 2016 - april 2016
Below is the report I wrote on this project and the code I wrote for the application.
| vita_ar_game_code.zip |
Introduction
The aim of the project was to design and develop a game application that utilised an innovative technology, currently being used in the games industry. The chosen technology was augmented reality (AR). Augmented reality is defined by website whatis.techtarget.com as “the integration of digital information with the user’s environment in real time” (Rouse 2016). A common example of AR would be viewing the world through a device or lens that offers additional information about the user’s surroundings.
The created application is a 3D platformer with a simple level editor. Users can make levels by placing and deleting blocks and setting the start and goal points. They can then play through the level by moving and jumping. The game is played on a flat surface, using a PlayStation Vita to look at the surface through its camera and scan for AR markers. One AR marker acts as a reference point for all objects in the game and another is used to move the player.
Augmented Reality Innovation
Augmented reality has been in used in games for many years now. An early example is the 2003 PlayStation 2 game, “EyeToy: Play” (SCE London Studio 2003). The game would use a camera to render gameplay elements over live video of the players. In recent years, AR games have become more common due to the increase in the availability of smartphones. Two common forms of AR technology are the use of cameras to recognise specific objects or markers and the use of location based data such as GPS or a compass to pinpoint where the user is (digit 2014). Smartphones are capable of both of these since they nearly always have an inbuilt camera, GPS and orientation sensor. Modern portable consoles, such as the Nintendo 3DS and the PlayStation Vita, also have these capabilities.
AR technology has been used to create new kinds of games. Marker recognition has been used to make table top 3D puzzle games such as PulzAR (XDev Studio Europe 2012) and location data has been used to make games which encourage players to explore outside such as Ingress (Niantic Inc. 2013). Augmented reality is also starting to be used as a tool to aid design. The most common examples are interior design and architecture but AR has the potential to help visualise the design of any 3D object. Rather than using awkward keyboard, mouse or touch screen controls to view a design, AR allows the user to look at a design from any angle or distance by simply moving a camera around a marker. There are already mobile apps available that were created for this very purpose (Busta 2015).
For this project, the capability of AR as a design tool was utilised in the application with the addition of a level editor. By having an AR marker act as a reference point, the user can create interesting levels on a table top and easily view them. An AR marker was also used to move the player through the levels to make the player feel more directly involved in the game.
Application Design
The program was planned to have many states that could be switched between. These states would be represented by a State class which would contain virtual functions that initialised, cleaned up, updated and rendered its objects. Each state would have its own class that inherits from this class and would override the virtual functions. A StateManager class would be created to store all the states and provide functions that allow the application to switch between them.
The application would have five states. A MarkerSelectState would allow the user to select an AR marker to be used as the reference marker for the level. A LevelEditState would store the level geometry and allow the user to edit it with a movable cursor. A PlayState would be used to let the user play through a level they had made. A MarkerLostState would be used to pause the application when an AR marker was lost until the marker was found again. Finally, a LevelCompleteState would be used to display when a player finished a level and allow them to return to the LevelEditState.
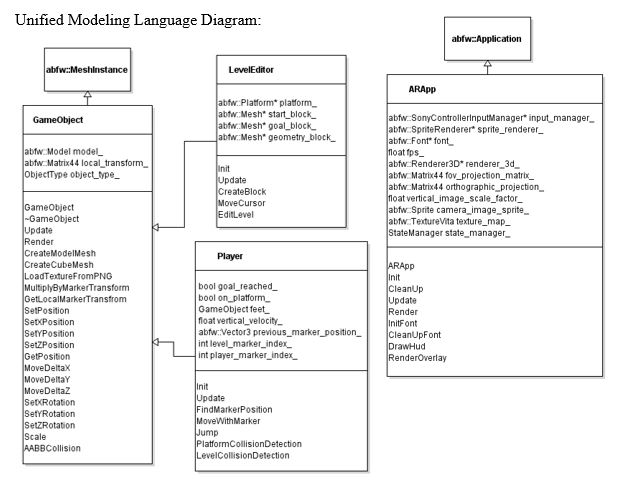
A GameObject class was planned to represent any 3D object in the game, such as the blocks of a level. The class would include functions to move the GameObjects and detect collisions with other GameObjects. Also there would need to be functions that used marker transforms to alter a GameObject’s transform so it had the correct size, rotation and position when rendered over the Vita’s camera feed.
Two classes would inherit from the GameObject class, the LevelEditor class and the Player class. The LevelEditor class would represent the cursor that creates and deletes cubes which will make up the geometry of a level. The Player class would be an object that the user controls in the PlayState that can be moved with an AR marker.
The aim of the project was to design and develop a game application that utilised an innovative technology, currently being used in the games industry. The chosen technology was augmented reality (AR). Augmented reality is defined by website whatis.techtarget.com as “the integration of digital information with the user’s environment in real time” (Rouse 2016). A common example of AR would be viewing the world through a device or lens that offers additional information about the user’s surroundings.
The created application is a 3D platformer with a simple level editor. Users can make levels by placing and deleting blocks and setting the start and goal points. They can then play through the level by moving and jumping. The game is played on a flat surface, using a PlayStation Vita to look at the surface through its camera and scan for AR markers. One AR marker acts as a reference point for all objects in the game and another is used to move the player.
Augmented Reality Innovation
Augmented reality has been in used in games for many years now. An early example is the 2003 PlayStation 2 game, “EyeToy: Play” (SCE London Studio 2003). The game would use a camera to render gameplay elements over live video of the players. In recent years, AR games have become more common due to the increase in the availability of smartphones. Two common forms of AR technology are the use of cameras to recognise specific objects or markers and the use of location based data such as GPS or a compass to pinpoint where the user is (digit 2014). Smartphones are capable of both of these since they nearly always have an inbuilt camera, GPS and orientation sensor. Modern portable consoles, such as the Nintendo 3DS and the PlayStation Vita, also have these capabilities.
AR technology has been used to create new kinds of games. Marker recognition has been used to make table top 3D puzzle games such as PulzAR (XDev Studio Europe 2012) and location data has been used to make games which encourage players to explore outside such as Ingress (Niantic Inc. 2013). Augmented reality is also starting to be used as a tool to aid design. The most common examples are interior design and architecture but AR has the potential to help visualise the design of any 3D object. Rather than using awkward keyboard, mouse or touch screen controls to view a design, AR allows the user to look at a design from any angle or distance by simply moving a camera around a marker. There are already mobile apps available that were created for this very purpose (Busta 2015).
For this project, the capability of AR as a design tool was utilised in the application with the addition of a level editor. By having an AR marker act as a reference point, the user can create interesting levels on a table top and easily view them. An AR marker was also used to move the player through the levels to make the player feel more directly involved in the game.
Application Design
The program was planned to have many states that could be switched between. These states would be represented by a State class which would contain virtual functions that initialised, cleaned up, updated and rendered its objects. Each state would have its own class that inherits from this class and would override the virtual functions. A StateManager class would be created to store all the states and provide functions that allow the application to switch between them.
The application would have five states. A MarkerSelectState would allow the user to select an AR marker to be used as the reference marker for the level. A LevelEditState would store the level geometry and allow the user to edit it with a movable cursor. A PlayState would be used to let the user play through a level they had made. A MarkerLostState would be used to pause the application when an AR marker was lost until the marker was found again. Finally, a LevelCompleteState would be used to display when a player finished a level and allow them to return to the LevelEditState.
A GameObject class was planned to represent any 3D object in the game, such as the blocks of a level. The class would include functions to move the GameObjects and detect collisions with other GameObjects. Also there would need to be functions that used marker transforms to alter a GameObject’s transform so it had the correct size, rotation and position when rendered over the Vita’s camera feed.
Two classes would inherit from the GameObject class, the LevelEditor class and the Player class. The LevelEditor class would represent the cursor that creates and deletes cubes which will make up the geometry of a level. The Player class would be an object that the user controls in the PlayState that can be moved with an AR marker.
Methodology
For the program state machine, the application used a State class and StateManager class. Each state of the program had its own class which inherited from the State class and overrode the virtual functions for initialising, cleaning up, updating and rendering. The states also stored the index of an AR marker since most states needed to be able to find a specific marker. The StateManager class stored the different states in a vector. It had four functions called clear, change state, push state and pop state. The clear function looped through the vector, called each state’s clean up function and removed it from the vector. The change state function called the current state’s clean up function, removed it from the vector, added a new state to the vector and initialised the new state. The push state function added a new state to the vector and initialised it. The pop state function called the currents state’s clean up function and removed it from the vector. This allowed the program to easily pause, resume and change states.
An ARApp class used an instance of the StateManager class to get the current program state. The current state was always the top state stored in the vector. In each update, the application would update the input manager and the call the update of the current program state. It would also pass the frame time, the input manager’s controller and the state manager to the current state’s update. The frame time was used for any moving objects so that they moved at a consistent speed. The controller allowed each state’s update to take inputs from the user and the state manager allowed the states to be changed during any state update. In each iteration of the render loop, the application would render the feed from the Vita’s camera by using it as texture on a sprite that was scaled to the size of the screen. It would then call the render of the current program state, passing in the sprite renderer and 3D renderer so that each state could draw 2D and 3D objects.
A GameObject class was used to represent any 3D object in the game. The mesh of a GameObject could either be a cube created in code or the mesh of an obj file that was loaded into the program. The objects were textured by loading in png files. To translate, rotate and scale the GameObjects, transformations would be performed on a local transform, stored by the GameObject, rather than a world transform. This was done so that GameObjects could be rendered relative to a marker on the play surface. To render an object, a world transform was calculated by multiplying the local transform by the marker’s transform. For collision detection, each GameObject had an axis aligned bounding box (AABB). The application compared the minimum and maximum vertices of two GameObjects’ AABBs to see if the boxes overlapped with each other. If the AABBs did overlap, then that meant the GameObjects were touching each other.
The LevelEditState class contained a vector of GameObjects representing blocks which made up the geometry of the level. During each iteration of the program loop, the class used the transform of the reference marker to calculate every block’s world transform and then rendered every block. Upon entering the PlayState, the vector of blocks was passed to the new state. The PlayState also calculated each block’s world transform and rendered them. The LevelEditState also contained an instance of a LevelEditor object, which had a reference to the vector of level blocks passed to it so it could alter the vector’s contents.
During initialisation, the LevelEditor created cube meshes for each type of level block that could be reused for making all the blocks. It then created a start point block and goal block which were placed off screen and added to the start of the vector. Each level only has a single start point and goal so by adding them to the start of the vector, they could easily be found and moved as necessary. It also meant that additional start points or goals could not be created by accident. The LevelEditor is represented by a transparent, blue, cube-shaped cursor which the user can move forward, back, left, right, up and down with d-pad and shoulder buttons. Every frame, the program would check for collisions between the cursor and each level block stored in the vector. If a collision was found, the program then checked if the block colliding with the cursor was a geometry block or not and the vector index of the block was stored. If the user pressed the x button and there was no collision, then a geometry block was placed at the position of the cursor and added to the vector. If there was a collision and the collision was with a geometry block, then the stored index was used to remove that block from the vector. When the cursor wasn’t colliding with any blocks and the square button was pressed, the start point was moved to the position of the cursor. Similarly, when there was no collision and the circle button was pressed, the goal was moved to that position.
The PlayState class contained an instance of a Player class. The player was represented by a 3D model of a walrus (Wozniak 2015) that was loaded in from an obj file. Upon entering the PlayState, the player was placed at the level’s start point. The Player class contained a variable for the player’s downwards, vertical velocity and a GameObject that was used to detect collisions between the feet of the model and the level geometry. Every frame, the Player was moved along the z-axis by the vertical velocity. If a collision was detected and the user pressed up on the d-pad, then a negative value was added to the downwards velocity to make the Player jump. While the Player was in the air, an acceleration was added to the velocity so that the Player would fall down. When the Player was standing on a platform, the velocity was set to zero. If the Player fell below the level, then it was moved back to the start point.
To move the Player forward, back, left and right, another AR card was used. To keep the Player rendered in relation to the reference marker, the second marker’s local transform relative to the reference marker needed to calculated. This was done by multiplying the second marker’s transform by the inverse transform of the reference marker. Every iteration of the game loop, the distance between the position of the marker’s local transform and its position in the previous frame was calculated. The Player was then moved by this distance. To keep the Player from moving through the level’s geometry blocks, the position of the Player, before it was moved, was temporarily stored. After moving the Player, the application checked for collisions between the Player and every level block. If a collision was found, then the Player was moved back to the stored position.
User Guide
The program requires a flat surface, such as an empty desk, and the user will need to hold the PlayStation Vita about 30-100cm away from the surface and point the camera at it. Upon starting the application, the user will be instructed to place an AR marker in front of the camera. This marker will act as a reference point for the levels. Any of the first five Vita AR cards can be used and it is advised that the chosen marker is placed on the bottom left corner of the surface area so that it doesn’t get in the way during gameplay. When one of the five markers is found, the player will be told to press the start button in order to select the found marker.
When a marker has been selected, the user will then be able to create and edit a level with that marker. A transparent blue cube will be on screen. This is the cursor that the user will edit the level geometry with. The d-pad will move the cursor forward, back, left and right and the shoulder buttons will move the cursor up and down. Pressing the x button will place a red cube at the position of the cursor, unless a red cube is already there in which case that cube will be removed. The start point and goal of a level are represented by transparent yellow and green cubes respectively. Pressing the square button will move the start point to the position of the cursor if there isn’t already a cube there and pressing the circle button will the move the goal. At any point should the Vita fail to detect the marker, the editor will be paused and the user will be told that the marker is lost until it is found again by the camera. If the select button is pressed, then the program will return to the marker select screen. If the start button is pressed, the program will start the game using the created level. The user should make sure that the Vita’s sixth AR card is on the table and in view of the camera before starting the game.
When play commences, the player’s walrus character will spawn at the start point. The walrus will jump whenever the user presses up on the d-pad. To move the walrus forward, back, left and right, the player will move the sixth AR card across the flat surface. When this marker or the level reference marker are not detected, the game will be paused until they are found again. The marker controlling the player movement may run out of space by reaching an edge of the play surface. When this happens, the user is advised to cover the marker, pausing the game, and move it back into the centre of the play surface before resuming play. The user can return to the level edit mode at any time by pressing the start button. When the walrus touches the goal cube, the player will be taken to a level complete screen. Pressing the start button on this screen will also return the user to the level edit mode.
Critical Analysis
There are many ways in which the application could be improved. Moving the player with an AR marker allows the user to cheat since the player moves across the surface as fast as the marker does. This means that, if the user is quick enough, the player can move across gaps in the level that it shouldn’t be able to even jump over. One way of fixing this would be to merely check the direction the AR card is moved in, rather than calculate the distance it has moved. Then the player could be moved at a constant speed in that direction. This may feel awkward to the user though since the player’s position won’t match up with the marker position.
Another problem is when the AR card reaches the edge of the play surface and the user needs to cover it and move it so that they can keep moving it in the same direction. This can be counteracted by keeping the levels within the bounds of the play surface. There are two ways this can be done. The user could hold the Vita further away from the surface so that the whole level fits on screen. If it’s held too far back though, then the camera may have trouble finding the markers and the user may not be able to easily reach the markers. The other option is to just keep the levels small enough to fit on the play surface. Since the levels are supposed to be created by the user, the application would need to either, instruct the user to not make the levels too big or restrict the space the level editor can use. The latter option would probably be easier since it would only require the program to keep the editor’s cursor within a set of boundaries.
Although the intention of moving the player with an AR marker was to make the player feel more directly involved in the game, this didn’t really work since the player sliding around the level doesn’t make sense in the context of the game. Having some kind of in game asset and animation might help to get the desired effect. For example, a hand picking up the walrus character and moving it when the player moves the AR card. If the whole game was designed around this concept, then it may feel more natural. For instance, if the player was usually controlled by button input but then needed to use an object such as a boat to get passed an obstacle. The boat or other object could be moved by an AR card, instead of the player, since this way the player would be directly involved in the game in a more organic way.
The application was originally intended to be able to save and load levels, using text files to store level date. The user would have pressed a button in the level editor to save the level in its current state. When this happened, the program would loop through all the game objects in the vector of level blocks and write the position and type of each block on a new line of a text file. There would be five text files that would be named after corresponding AR cards. E.g. marker1level, marker2level etc. When the user selected a marker to be used for the level, the level editor would read through that marker’s text file and for every line in the file, it would create a block of the specified type and move it to the specified position. This would allow the user to resume editing a level or play a level they had previously created. Since the framework used for the project did not have the capability to write data to files, code for this would’ve needed to be written from scratch. As a result, the feature was not implemented.
There are many objects and variables that get passed through multiple functions in the code. This includes the platform, state manager, input controller, frame time, marker index, level blocks vector, sprite renderer and 3D renderer. Constantly having to pass all these tools around becomes very gratuitous. An alternative would be to implement the service locator pattern as described in the book, Game Programming Patterns (Nystrom 2014).
Conclusion
Augmented reality games that use markers are quite tricky to design. Combining a physical space with a digital space can get complicated when boundaries don’t match up. For instance, encountering the edge of a table when moving an AR card but still having space to move in the game.
Deciding on what should be used as a reference or origin point is very important and the choice should reflect the nature of the game. In the case of this project where all the gameplay takes place on a flat surface, having an AR card as the reference point makes sense. For a game where the player has to fire projectiles from the Vita at multiple targets, using the Vita itself as the reference point would be more suitable.
Moving AR cards around the table when the game is viewed through the Vita screen can make gameplay awkward as only one hand can hold the device. This also means that button input is limited to buttons on one side of the controller. If button inputs are used in conjunction with moving AR cards then there is risk of dropping the device since holding it, pressing buttons and aiming the camera with just one hand, can make it difficult to keep a firm grip on the console. This would be particularly problematic for fast paced action games where the player has to move the camera and react quickly. A possible solution would be to use a hands-free viewing device such as a pair of glasses with AR capability. Having a one handed controller which is easier to hold would also be an improvement.
For games that rely on using AR marker cards, handling marker loss is crucial. The slightest obfuscation of the marker is enough for the device to be unable to detect it. Without some form of error message, the user may not realise the marker has been lost and will be confused as to why objects in the game are not moving as expected. If it is unclear when the marker has been lost and when it has been found; players may find themselves frantically moving the camera or AR markers until they get the game to respond as they expect it to. This breaks their immersion and takes time away from playing the game. A lost marker message makes it clear to the user when they need to reposition the marker card and/or the camera but unfortunately still causes immersion to be briefly broken. Augmented reality that doesn’t require markers but can still find boundaries in physical space, is desirable in order to push what AR games can do.
References
Busta, H. 2015. Three Augmented and Virtual Reality Apps for Design and Construction. [online]. Available from: http://www.architectmagazine.com/technology/products/three-augmented-and-virtual-reality-apps-for-design-and-construction_o.
digit 2014. The Magic Behind the Science. [online]. Available from: http://www.digit.in/technology-guides/fasttrack-to-augmented-reality/the-magic-behind-the-science.html.
Niantic Inc.2013. Ingress. Niantic Inc.
Nystrom, R. 2014. Service locator. In: Anon. Game programming patterns.
Rouse, M. 2016. augmented reality (AR). [online]. Available from: http://whatis.techtarget.com/definition/augmented-reality-AR.
SCE London Studio2003. EyeToy: Play. Sony Computer Entertainment.
Wozniak, W.2015. Voxel Walrus Guy. opengameart.org: .
XDev Studio Europe2012. PulzAR. SCEE.
